
Measure Body Fat Accurately Using the Buoyometer
What is the Buoyometer?
The Buoyometer is a body-composition device that uses buoyancy-based measurement to measure body density. By knowing your body’s density, you can determine your overall body composition. Two people can weigh the same while having completely different body compositions. The Buoyometer is designed to reveal the difference.
How Does it Work
The device determines body density using underwater weight and buoyancy calculations.
By understanding body density, users can better determine body fat percentage, track physical progress more accurately, and make more informed fitness and dietary decisions
Who it’s for
The Buoyometer is designed for anyone who wants a deeper understanding of their body composition and overall health. Traditional scales only measure total weight, but two people can weigh the same while having completely different levels of body fat, muscle mass, and fitness. A person can become stronger, leaner, and healthier without major changes in scale weight. Likewise, someone’s health can decline while their weight appears unchanged. The Buoyometer helps reveal the difference.
Accessible body composition measurements.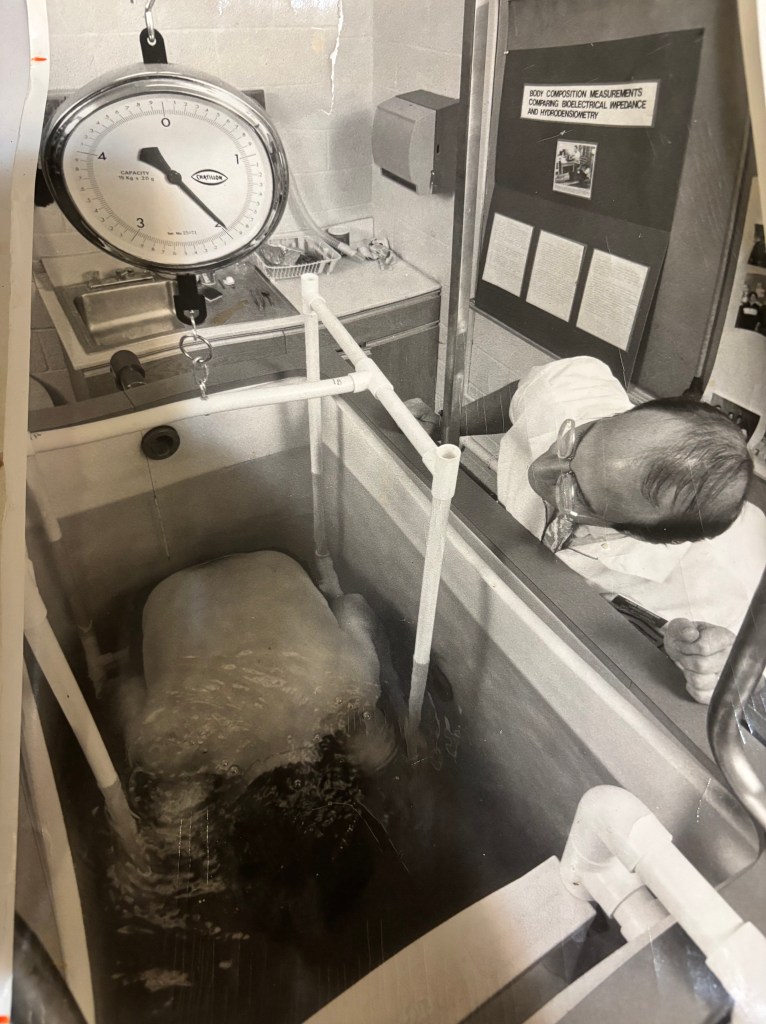
Hydrostatic weighing (see photo above) has been the historical “gold standard” method of determining body composition.
There are companies that specialize in making “underwater scales” as well as tanks for those scales. Theysell these scales & tanks to research labs, universities, etc. Here’s a link to one such company:
hydrodensity.com
The buoyometer is a simple analog device that accurately and easily measures your hydrostatic weight. No need for a laboratory nor an observer – all you need is a body of water and a few minutes. Take measurements weekly, monthly, yearly – as often as you like. Knowing your body density lets you determine whether you’re gaining muscle, fat, or staying the same.
Hydrometers have been used for centuries to determine solution densities. I like to describe the buoyometer as an “inverse hydrometer” – where the solution (water) is used to determine the density of the body. Because “lean” body mass is heavier than “fat” body mass, knowing your body density easily translates to body composition. The idea of using a “float” to measure body density was originally patented in 1989. I call this patent the “pickle jar patent.”
View Original 1989 Patent
In efforts to improve on the “pickle jar” patent, above, I brainstormed and experimented with improvements. The end result is the buoyometer [see patent below].
View Buoyometer Patent
Make your own Buoyometer! Follow the DIY instructions below to make your own:
DIY – How to make your own Buoyometer
The Buoyometer is Patented, which prevents you from making it to sell. However, ANYONE can make their own. This is a step-by-step description of how I make prototype Buoyometers. In general, the Buoyometer consists of a “float” (this is the component that lifts your submerged body weight) and a “gauge” (this is the tube that is used to “mark” how much of the float was submerged at neutral buoyancy).
- Source a “float.” The float can be anything that floats. However, it should be geometrically consistent and waterproof. Anything less dense than water (1 gm/cubic centimeter) will float. When I was originally experimenting with this idea I used a kickboard at the pool – and that worked. I arrived at thin-walled 4” diameter PVC piping cut to 22” lengths to attain an instrument “range” of 10#. However, you could make a buoyometer with anything that floats and is geometrically consistent. That is, the vertical submersion of a given depth should displace an equal (precise and consistent) amount of water. A pool “noodle” or balsa wood 4” x 4” would work.
- Source a gauge tube. This is a plastic see-through tube/pipe attached to the float that allows you to “mark” how deep the float is submerged at neutral buoyancy.
- Calibrate the “float”. I use a barrel filled with water to determine the zero (which is where the Buoyometer sits in the water with just its own weight acting downwards) and at least two points on the “range” – at least a mid-point and a high point. Here’s how I do that:
- Attach at least 2 eyelets (top and bottom of float vertically oriented) sized to house the gauge tube.
- Place a long rod (must be longer than the float; I use a 4’ long, ¼” diameter wood dowel available at any hardware or hobby store) through the eyelets and submerge your float – using the rod to keep the buoyometer exactly vertical – perpendicular to surface of water). Where the float sits with no force on it is your zero.
- Mark the zero with a sharpie or other method that stands up to water (etching or stickers work too).
- Place a known weight atop the float to measure a mid-range point. I use 2, 5, and 8 lb dumbbells. ATTN – you must know the exact weigh of the dumbells. DO NOT ASSUME that a 2 lb dumbbell is 2.00 pounds – it’s almost CERTAINLY NOT. I use a kitchen scale to accurately weigh and label each dumbbell used for “calibration.”
- Mark each point (in my case, 2#, 5#, and 8#). Because the float is geometrically consistent, you exactly correlate the change in the float’s submersion with the buoyant “force.” For example, for my prototypes, each inch of float submersion equates to 0.5 lb force (weight).
- Mark the float with the “scale.” From the “zero” mark, mark the 1#, 2#, 3#…. up the float. I apply waterproof laser printed (ink runs) stickers. But for a homemade unit a sharpie would work.
- Install the gauge tube. Using the eyelets for the gauge tube, thread the gauge tube through the eyelets extending below the float so you’re able to seal the water column that fills the gauge tube with your finger.
Congratulations, you have made a Buoyometer!
 Introducing the Buoyometer